Red Velvet Chocolate Cheesecake Brownies Recipe combines a fudgy red velvet brownie base with two distinct cheesecake layers: one vanilla-forward and one chocolate-rich. This article explains what makes this dessert different from standard red velvet brownies, how the cheesecake components change the texture, and what to expect from the finished bars once they set. You will also learn which ingredients matter most, what swaps keep the flavor on track, and how to avoid the common issues that affect clean slices and balanced layers.
What This Dessert Is and Why It Fits Search Intent
What “red velvet chocolate cheesecake brownies” means in practice
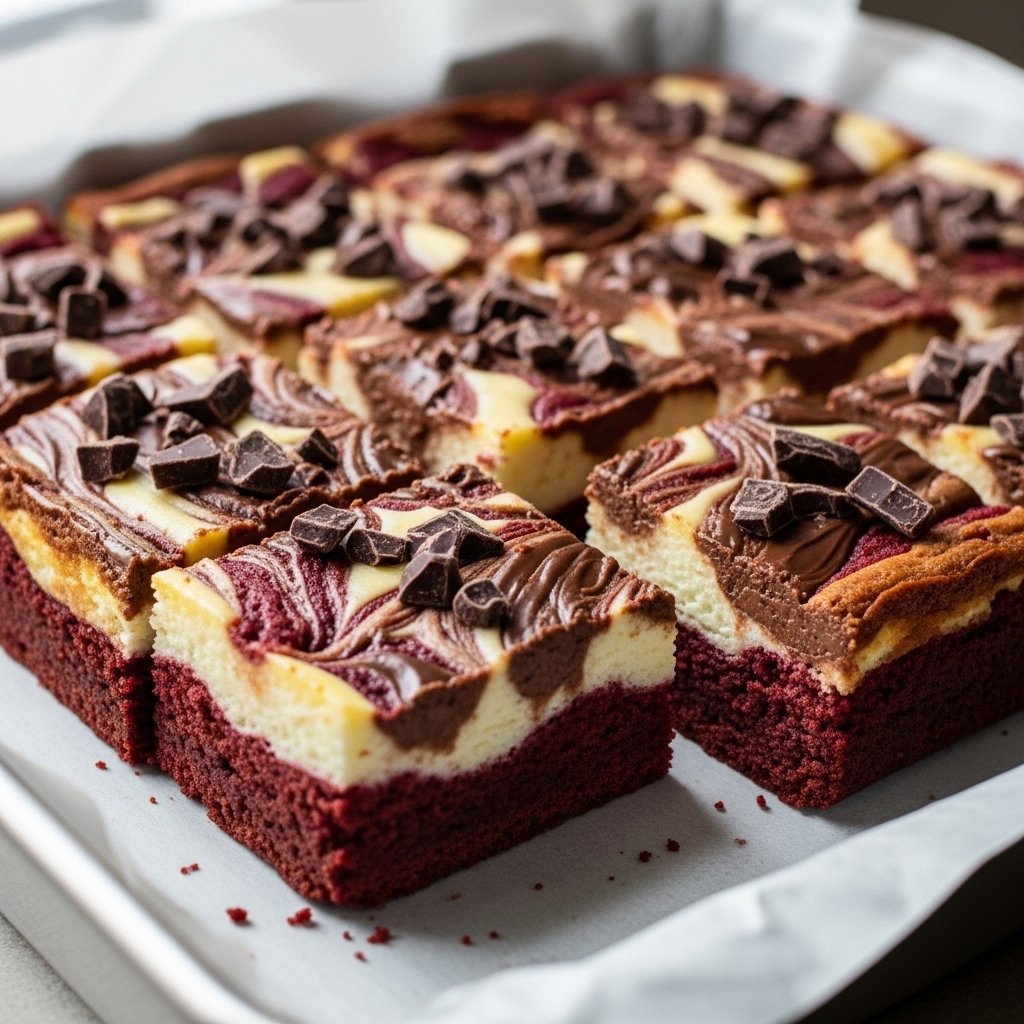
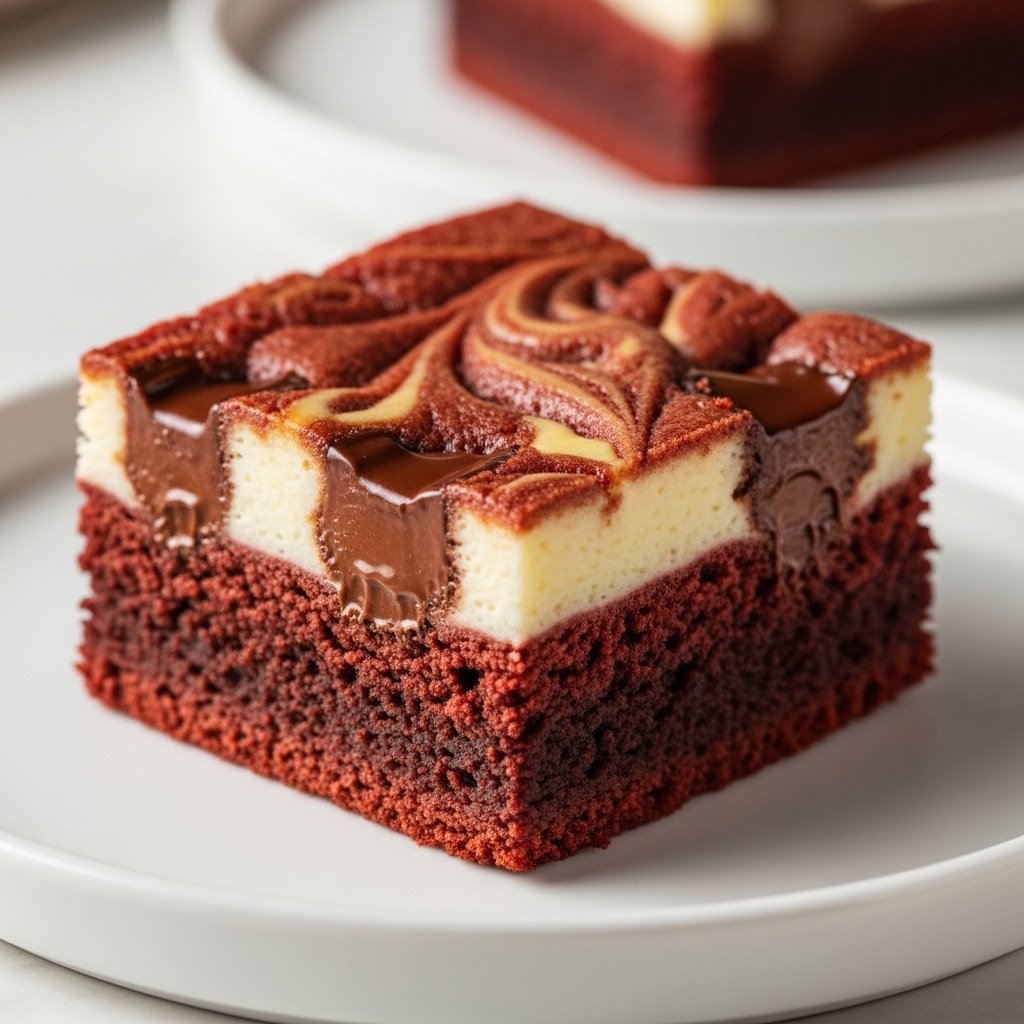
This dessert stacks three familiar ideas into one bar. The red velvet brownie layer brings cocoa depth, a mild tang, and a dense, fudgy bite. The cheesecake layers add creamy contrast and a structured richness that turns a basic brownie into a bakery-style slice. The chocolate cheesecake portion leans more truffle-like because it uses melted chocolate for body, while the vanilla cheesecake portion stays bright and clean, which helps keep the bar from tasting heavy.
Why people look for this specific combo
Many home bakers want the look and flavor profile of red velvet but prefer the richer chew of brownies over cake. Others want cheesecake flavor without making a full cheesecake. This recipe style solves both needs by baking everything in one pan, delivering a dramatic swirl or layered look, and creating a dessert that works for holidays, parties, and make-ahead entertaining where clean, portable squares matter.
Ingredient Insights and High-Level Flavor Context
Ingredient notes and practical swaps
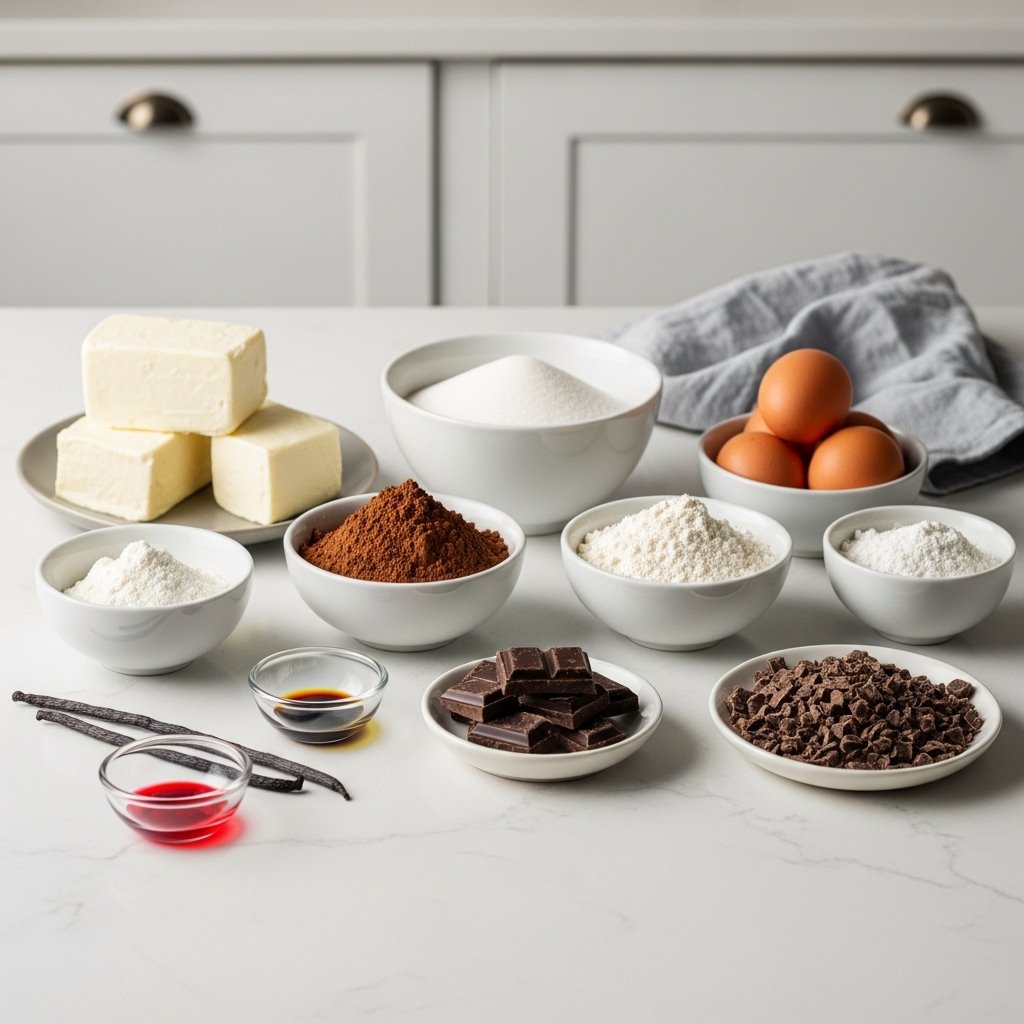
Cream cheese drives both cheesecake layers, so room-temperature cream cheese matters for a smooth, lump-free filling and an even bake. Heavy cream supports a creamy mouthfeel and helps the chocolate cheesecake blend cleanly with melted chocolate. Dark or semi-sweet chocolate gives the chocolate cheesecake structure and intensity; milk chocolate can taste too sweet once it mixes with sugar and cream cheese.
Vanilla bean paste delivers a deeper vanilla profile, but vanilla extract works if needed. Vinegar supports the classic red velvet tang and helps round out the cocoa flavor. Dutch-processed cocoa powder gives a smoother chocolate note and a darker color tone; natural cocoa can work, but it can taste sharper and look lighter. Red food color handles the signature look; gel color often gives a stronger red with less liquid impact than many liquid dyes. For mix-ins, chopped white, dark, and milk chocolate creates varied sweetness and texture, while chocolate chips keep the bite more uniform.
Flavor, texture, and method benefits
This recipe balances three textures: fudgy brownie, creamy cheesecake, and melted chocolate pockets from the chopped chocolate. Browned butter contributes a toasted, nutty depth that prevents the bar from tasting one-note sweet, and it pairs especially well with cocoa and dark chocolate. Using both white and brown sugar builds moisture and chew in the brownie layer while adding a subtle caramel note that complements the cheesecake richness. The two cheesecake flavors also improve balance: vanilla cheesecake lightens the overall profile, while chocolate cheesecake adds a deeper, more dessert-forward finish.

Red Velvet Chocolate Cheesecake Brownies Recipe
Ingredients
- 8 oz cream cheese room temperature (226g)
- ¼ cup white sugar 50g
- 2 tbsp heavy cream
- 1 egg
- 1 tsp vanilla
- 100 g dark or semi-sweet chocolate
- ¼ cup heavy cream 60g
- 6 oz cream cheese room temperature (170g)
- ¼ cup white sugar 50g
- 12 tbsp unsalted butter 170g
- 50 g dark chocolate
- ¾ cup white sugar 150g
- ½ cup brown sugar 100g
- 2 large eggs
- 2 tsp vanilla bean paste
- ½ tsp vinegar
- ½ tbsp red food color
- 1 cup all purpose flour 130g
- 2 tbsp Dutch processed cocoa powder 12g
- ¾ tsp salt
- 100 g of chopped white dark and milk chocolates (or chocolate chips) to your liking
Instructions
- Vanilla cheesecake filling:
- Add the cream cheese, sugar, heavy cream, egg and vanilla to a bowl. Whisk on medium-low speed until a creamy mixture forms, scraping the bowl as you go. Do not overmix. Set aside
- Chocolate cheesecake filling:
- Add the chocolate and heavy cream to a microwave safe bowl. Microwave in 20 second increments until the chocolate melts into the cream to form a smooth ganache. Avoid overheating or overmixing
- Separately, whisk the cream cheese with the sugar on medium-low speed until a creamy mixture forms
- Fold the ganache into the cream cheese mixture gently until combined, scraping the bowl as you go. Do not overmix. Set aside
- Red velvet brownie batter:
- Add the butter to a saucepan. Cook and stir on medium heat for a few minutes until the butter has melted and you see brown specks in it. It will also smell nutty at this point. Remove from heat quickly once the butter reaches this stage to avoid getting it burned
- Add the dark chocolate to the butter and stir to melt it in
- In a large bowl, whisk the white sugar, brown sugar, eggs, and vanilla on high speed until a very pale, frothy and light mixture forms (at least 3-4 minutes)
- Whisk in the vinegar, red food color and butter/chocolate mixture until combined
- Sift in the flour, cocoa powder and salt, and use a rubber spatula to very gently fold until just combined. Do not overmix
- You can fold in the chopped chocolate here, or add it during assembly. I recommend the later as the brownie batter is easier to spread without the chocolate in it
- Assembly and baking:
- Pre-heat your oven to 350F (conventional / no fan) and line a 9×9″ baking pan with parchment paper
- You can layer the brownie batter and two cheesecake fillings however you like (e.g., add the brownie layer, then top one by one by each cheesecake filling, or add the brownie layer and then dollop on and swirl the two cheesecake fillings) — see notes
- To follow my method exactly (see pictures in blog post above), first spread half of the brownie batter and top with some chopped chocolate. Then pipe the two cheesecake fillings in thick alternating lines. Top off with the remaining brownie batter, and dollop on any remaining cheesecake fillings. Use a toothpick to swirl the cheesecake fillings, and decorate with chopped chocolate — see notes
- Once assembled, bake in the pre-heated oven for 30-35 minutes until a toothpick inserted in the middle comes out with moist, sticky crumbs attached
- Let the brownies rest in the pan for at least 20 minutes at room temperature. Then transfer to the fridge for 1 hour to fully set them before slicing and eating
Notes
I recommend storing these brownies in the fridge due to their cheesecake filling, but I like to eat them at room temperature or slightly warmed up in the microwave
User Value and Guidance
Tips for best results
Use fully softened cream cheese for both fillings to keep the texture smooth and prevent small lumps that show up after baking. Keep mixing gentle once the cheesecake mixtures look creamy, since overmixing can incorporate extra air and lead to a puffed top that settles unevenly. Choose dark or semi-sweet chocolate for the chocolate cheesecake so it sets with a rich bite instead of turning overly sweet.
Aim for a brownie batter that stays thick and glossy, since that structure supports clean layers and defined swirls. Keep the red color balanced so the cocoa still reads as chocolate instead of tasting like dye. Plan for chilling time before slicing, since the cheesecake layers need time to firm up for clean edges and distinct contrast.
Common mistakes and misconceptions
Many people expect red velvet to taste strongly chocolatey, but this style tastes more like mild cocoa with tang and vanilla notes. Using too much cocoa can push it toward a standard chocolate brownie and mute the red velvet profile. Overbaking can dry the brownie base and make the cheesecake layer feel chalky, while underbaking can leave the center too soft to slice cleanly.
Another common issue comes from uneven distribution of the cheesecake fillings. If one area gets too much filling, the bar can bake with dips or soft spots that make it harder to lift and cut. Mixing the chocolate cheesecake too aggressively after adding ganache can thin it and reduce the distinct chocolate layer effect. Skipping the chill can also create messy slices that smear the top pattern and blur the layers.
Storage, Serving Ideas, Variations, and FAQs
Storage, serving ideas, and simple variations
Store these brownies in the refrigerator because the cheesecake layers stay safest and most stable when chilled. Keep them in an airtight container to prevent the surface from drying out and to protect the cheesecake from absorbing fridge odors. For the best eating texture, serve them slightly tempered at cool room temperature so the brownie feels fudgy and the cheesecake tastes creamy rather than stiff. A brief warm-up can soften the brownie layer, but keep heat gentle so the cheesecake stays intact.
For variations, adjust the chocolate mix-ins to match the sweetness level you want. Use more dark chocolate for a deeper finish or more white chocolate for a sweeter contrast against the tangy red velvet base. You can also emphasize one cheesecake flavor by making larger swirls of vanilla or chocolate for a more defined look in each slice.
FAQs
Red Velvet Chocolate Cheesecake Brownies Recipe uses a red velvet brownie base with two cheesecake fillings, one vanilla and one chocolate, baked together in a single pan for a layered or swirled bar.
Cream cheese should reach room temperature before mixing so the cheesecake layers blend smooth and bake evenly without visible lumps.
Dutch-processed cocoa helps keep the flavor smooth and the color darker, which supports a richer red velvet profile without tasting harsh.
Chilling the brownies before slicing improves structure and helps you get clean squares with distinct layers instead of smeared cheesecake.
These red velvet chocolate cheesecake brownies deliver a rich, structured bar that cuts cleanly and holds its shape, while still tasting soft, fudgy, and creamy when served correctly.